Logo carousels are a powerful way to showcase partnerships and build trust with your audience. At Pluginizer, we’ve seen firsthand how these dynamic displays can elevate a website’s credibility and visual appeal.
In this guide, we’ll walk you through the process of creating a logo carousel in Elementor step by step. Whether you’re a seasoned web designer or starting, you’ll find practical tips to make your logo carousel stand out and effectively represent your brand.
What’s a Logo Carousel?
Definition and Purpose
A logo carousel is a dynamic, rotating display of brand logos on a website. It’s an efficient way to showcase partnerships, clients, or affiliations without cluttering the page. Logo carousels have gained popularity among website owners who want to quickly boost their site’s credibility.
The Power of Trust Signals
Logo carousels are more than just visual elements; they’re powerful trust signals. Visitors seeing recognizable brands associated with your business instantly elevates your perceived value. A Nielsen study found that 84% of consumers trust recommendations from people they know, and logo carousels tap into this psychology by implying endorsements from well-known entities.
Design for Maximum Impact
The effectiveness of a logo carousel lies in its execution. Here are some tips for optimal design:
- Use high-quality, monochrome logos for a clean, professional look
- Limit the number of logos to 5-7 at a time (this prevents overwhelming your visitors)
- Set a comfortable pace for the carousel movement (too fast becomes distracting; too slow loses impact)
Strategic Placement Boosts Conversions
The location of your logo carousel can significantly affect its impact. Positioning it above the fold on your homepage or near call-to-action buttons can increase conversion rates. For example, a company that implemented a well-designed logo carousel on its landing page saw a 20% decrease in bounce rates on ad landing pages and a 15% increase in qualified leads.
Leveraging Social Proof
A logo carousel isn’t just about displaying logos; it’s about strategically leveraging social proof to build trust and drive action. When implemented correctly, it becomes a powerful tool in your website’s arsenal.
As we move forward, let’s explore the step-by-step process of creating a practical logo carousel using Elementor (a popular page builder for WordPress). This guide will help you harness the full potential of this dynamic feature for your website.
How to Create a Logo Carousel in Elementor
Choosing the Right Tools
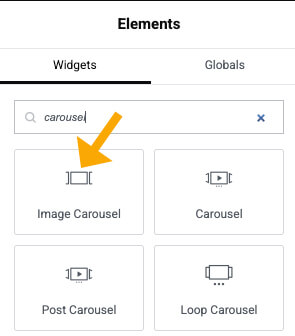
To create a logo carousel in Elementor, you must install Elementor Pro on your WordPress site. The Pro version includes the Image Carousel widget, which is perfect for this purpose. Pluginizer offers a cost-effective subscription service that allows you to access Elementor Pro and thousands of other premium plugins.
Setting Up Your Logo Carousel
Open the page where you want to add your logo carousel. Then, drag and drop the Image Carousel widget into your desired location. This widget is designed explicitly to showcase multiple images in a carousel format, making it ideal for logo displays.
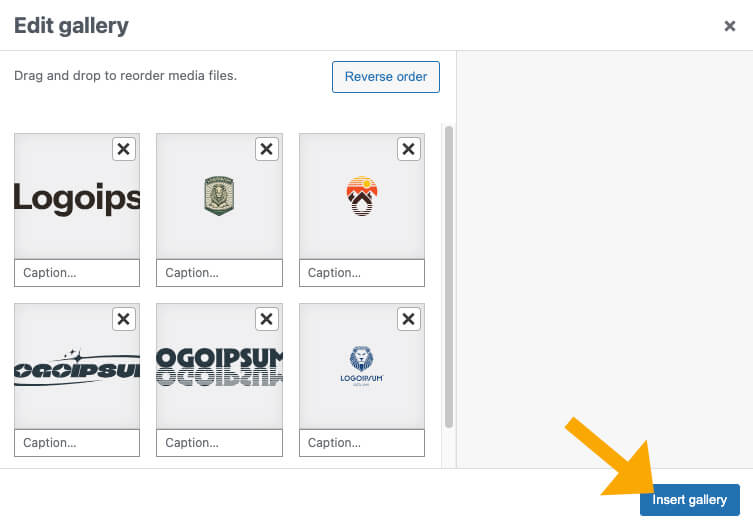
Optimizing Your Logos
Before you upload your logos, optimize them for web use. Best practices for carousels include loading carousel content using HTML, avoiding layout shifts, using modern technology, and optimizing carousel content. To create a more professional look, maintain consistency in size and style across all logos.
Before uploading the images to your WordPress website, please optimize and reduce their size for faster loading. You can do that automatically using a dedicated plugin such as Imagify or manually online using TinyJPG.
Customizing Your Carousel
Elementor’s Image Carousel widget offers extensive customization options. Focus on these key settings:
- Slides to Show: Set this to 4-6 logos for desktop views and fewer for mobile.
- Autoplay: Enable this feature with a 3-5 second delay between slides.

- Infinite Loop: Turn this on to create a seamless, continuous display.
- Navigation: Choose between arrows, dots, or both for user control.


Testing and Refinement
Test your carousel on various devices to ensure it looks great and functions smoothly across all screen sizes. Make adjustments as needed to optimize the display for different viewport sizes.
The next step in creating a practical logo carousel involves implementing best practices to maximize its impact and effectiveness. Let’s explore these strategies to ensure your logo carousel looks tremendous and delivers tangible benefits to your website.
Maximizing Impact with Logo Carousels
Curate Your Logo Collection Wisely
The logos you select can determine the effectiveness of your carousel. Display recognizable brands that resonate with your target audience. A Nielsen study revealed that 92 percent of consumers worldwide trust earned media, such as recommendations from friends and family, above all other forms of advertising, so well-known logos can significantly boost your credibility.
Avoid the temptation to showcase every partner logo. Quality trumps quantity. Select 5-7 high-impact logos that best represent your business relationships. This approach prevents visitors from being overwhelmed and ensures that each logo receives proper attention.
Optimize for Speed and Performance
Image optimization is essential for fast load times. Large, unoptimized images can slow down your site, negatively impacting user experience and search engine rankings.
Use image compression tools to reduce your logo file sizes without quality loss. Try to keep file sizes under 100KB per logo. Consider using WebP format for images, which can provide superior compression and quality characteristics (compared to PNG or JPEG).
Mobile-First Design Approach
Over half of global web traffic comes from mobile devices, and 80% of internet users own smartphones. Your logo carousel must look great on smaller screens. Adjust the number of logos displayed based on screen size. For mobile devices, simultaneously display 2-3 logos to maintain readability without overwhelming the small screen real estate.
Test your carousel on various devices and screen sizes. Pay attention to load times, image quality, and overall user experience. Mobile-friendly testing tools can provide valuable insights into your optimization efforts.
Strategic Linking for Enhanced Engagement
While linking each logo to its website seems logical, consider the potential drawbacks. External links can lead visitors away from your site, potentially hurting your conversion rates. Instead, link logos to your site’s relevant case studies or partnership pages. This approach keeps visitors engaged with your content while still providing valuable information about your partnerships.
If you use external links, ensure they open in new tabs so your site stays open in the original tab. This practice maintains your site’s presence while allowing visitors to explore partner sites.
Final Thoughts
Creating a logo carousel in Elementor empowers you to showcase partnerships and build trust with your audience. This dynamic feature is a visual testimonial instantly communicating your company’s credibility and connections. By following the steps outlined in this guide, you can quickly implement a logo carousel in Elementor.
We encourage you to experiment with different carousel styles to find the best one for your website. Each website is unique, and finding the right balance will enhance its overall design and user experience. For example, you can try varying the number of logos displayed, adjusting the autoplay speed, or testing different navigation options.
For those who want to streamline their WordPress plugin management while accessing premium tools like Elementor Pro, Pluginizer offers an excellent solution. With access to over 15,000 premium plugins and themes, Pluginizer can help you create stunning logo carousels and much more (all under one subscription). Implementing a logo carousel in Elementor is one of many ways to elevate your website’s design and functionality.