Email marketing and website design are two crucial elements of digital marketing. At Pluginizer, we’ve seen how powerful these tools can be when used together effectively.
Integrating Mailchimp with Elementor can supercharge your marketing efforts. This guide will show you how to seamlessly combine these two platforms for maximum impact.
Why Combine Mailchimp and Elementor?
Mailchimp: The Email Marketing Powerhouse
Mailchimp stands at the forefront of email marketing. The platform’s advanced segmentation allows users to target specific audience groups, potentially resulting in higher open rates. Mailchimp provides email marketing benchmarks to help users understand how their campaigns compare to industry standards.
Mailchimp’s automation features transform email marketing. Users can set up welcome series, abandoned cart reminders, and birthday emails automatically. This automation saves time and maintains consistent communication with subscribers.
Elementor: Revolutionizing Website Design
Elementor changes the game for WordPress users. Its drag-and-drop interface eliminates coding requirements. Users create custom layouts, design eye-catching call-to-action buttons, and craft responsive designs effortlessly.
The true strength of Elementor lies in its flexibility. It significantly reduces development time through visual editing capabilities. This accessibility has made it a popular page builder for WordPress, which powers 43.5% of all websites as their CMS.
The Synergy of Integration
The combination of Mailchimp and Elementor creates a marketing powerhouse. Users design beautiful opt-in forms directly in Elementor and connect them seamlessly to Mailchimp lists. This integration streamlines workflows and improves conversion rates.
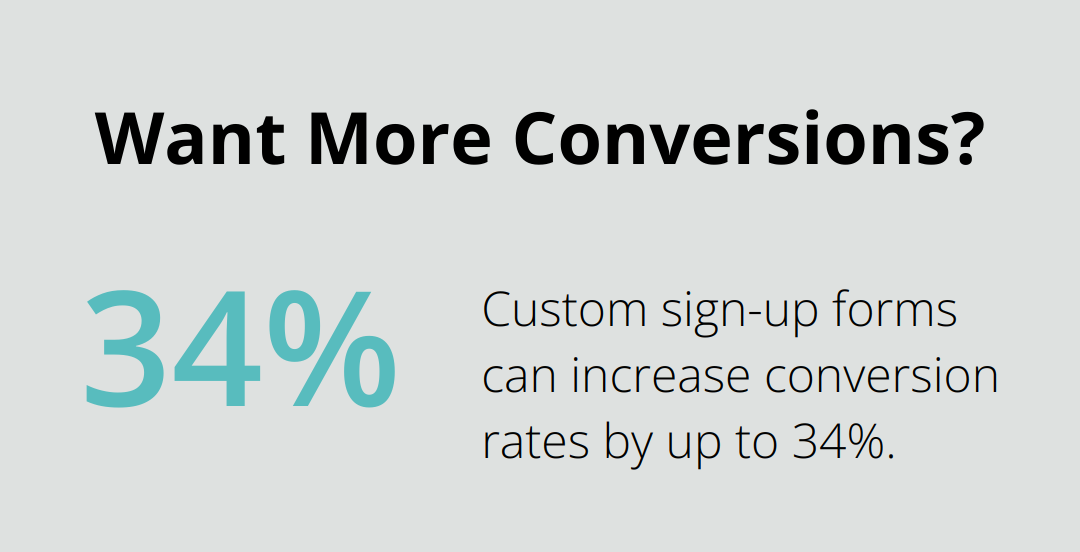
A study by Omnisend found that custom sign-up forms can increase conversion rates by up to 34%. The Mailchimp-Elementor duo sets users up for success with Elementor’s design capabilities and Mailchimp’s list management.
Cohesive Branding and User Experience
The integration allows for more cohesive branding. Email designs match websites perfectly, creating a consistent user experience from first click to final purchase. This consistency strengthens brand recognition and trust.
Improved Performance and Efficiency
Users report faster design times and improved email performance when using these tools together. The seamless connection between website design and email marketing efforts leads to more efficient campaigns and better results.
While other email marketing and page builder combinations exist, the Mailchimp-Elementor duo stands out for its effectiveness and ease of use. (For those seeking even more flexibility and cost-effectiveness, Pluginizer offers access to over 15,000 premium plugins and themes, including alternatives that might suit specific needs.)
As we move forward, let’s explore the step-by-step process of integrating these powerful tools to maximize your marketing efforts.
How to Set Up Mailchimp with Elementor
Install Elementor Pro
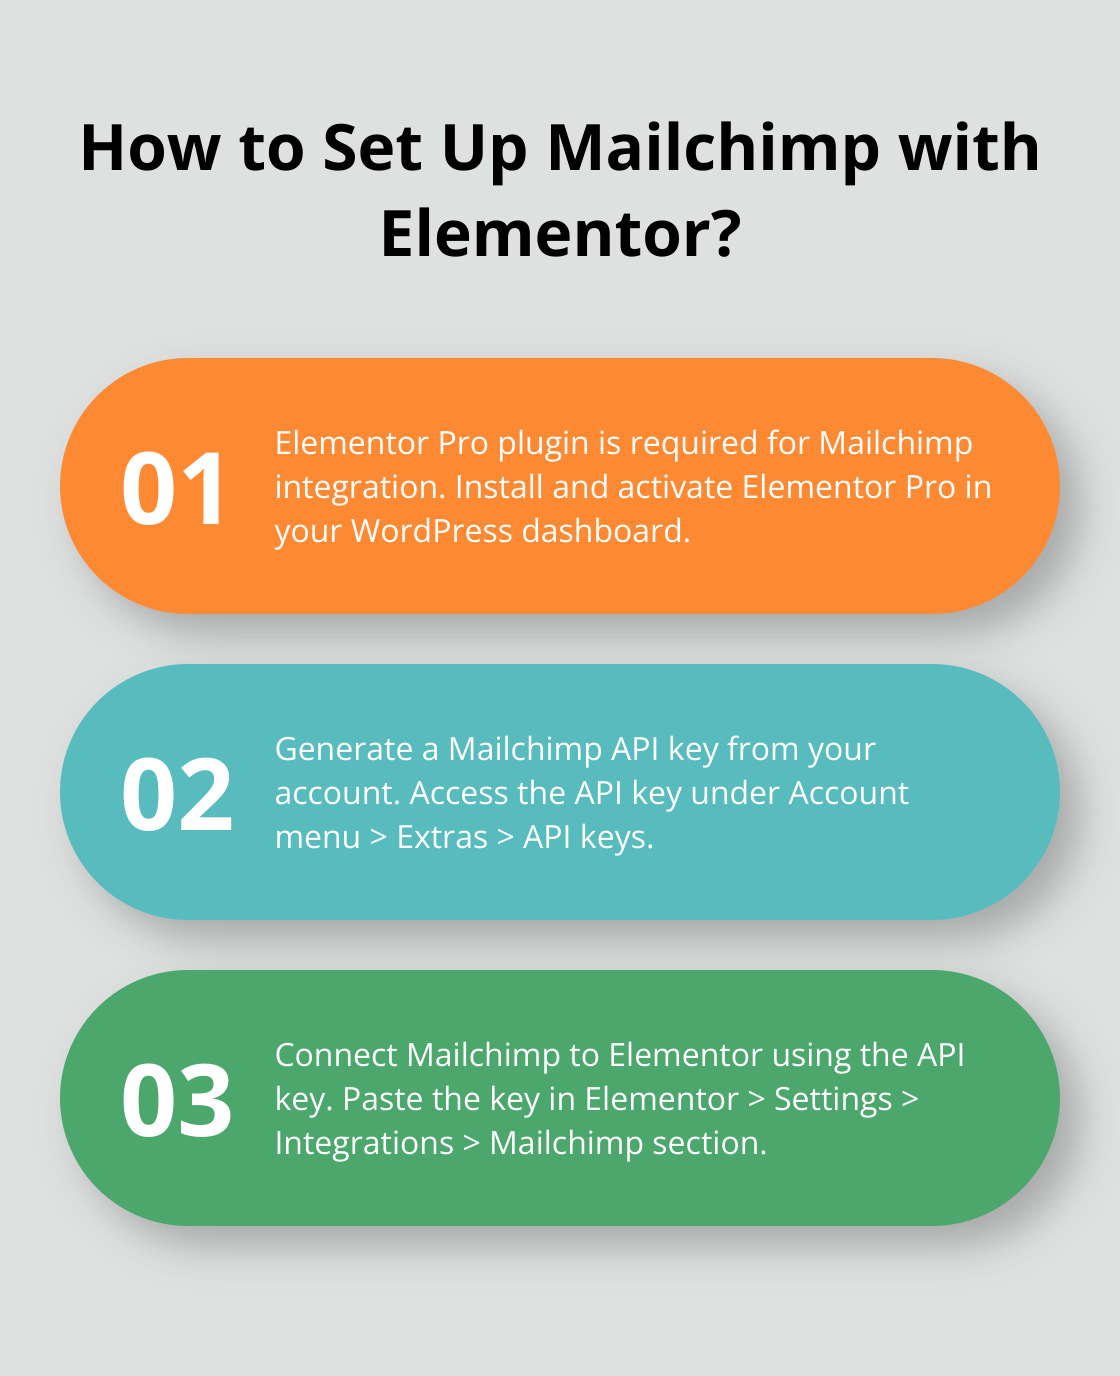
To begin the integration process, you must install the Elementor Pro plugin. This premium version includes the necessary Mailchimp integration feature. After installation, activate the plugin in your WordPress dashboard.
Generate Mailchimp API Key
The next step involves generating an API key from your Mailchimp account. Log in to Mailchimp and navigate to the Account menu. Click on Extras, then API keys. Create a new API key and copy it for later use.
Connect Mailchimp to Elementor
In your WordPress dashboard, go to Elementor > Settings > Integrations. Locate the Mailchimp section and paste your API key into the designated field. Click Connect. A green checkmark will appear if the connection is successful, indicating that Elementor is now linked to your Mailchimp account.
Create Mailchimp Forms in Elementor
With the connection established, you can now create Mailchimp forms directly in Elementor. Edit a page with Elementor and drag the Form widget onto your page. In the widget settings, select Mailchimp as your action after submit. Choose the Mailchimp list you want to add subscribers to and map the form fields to the corresponding Mailchimp fields (this ensures correct data transfer).
Optimize Form Design
Utilize Elementor’s design options to create visually appealing and on-brand forms. Use contrasting colors for your submit button to make it stand out.
Test Your Integration
Before launching, conduct thorough testing of your form. Submit test entries and verify in your Mailchimp account that subscribers are being added correctly. This step is essential for identifying potential issues before your form goes public.
The seamless integration of Mailchimp with Elementor opens up a world of possibilities for your email marketing efforts. In the next section, we’ll explore best practices to maximize the effectiveness of this powerful combination.
By leveraging Mailchimp for WordPress, you can easily manage your lists and set up automated campaigns.
Maximizing Your Mailchimp-Elementor Integration
Craft Irresistible Opt-in Forms
The growth of your email list depends on creating opt-in forms that captivate visitors. Elementor’s visual, drag-and-drop editor enables you to design striking forms, but content remains paramount.
Begin with a powerful headline that clearly articulates your value proposition. Replace generic phrases like “Subscribe to our newsletter” with specific offers such as “Receive exclusive weekly tips to increase your website traffic by 50%.” This specificity can dramatically boost your conversion rates.
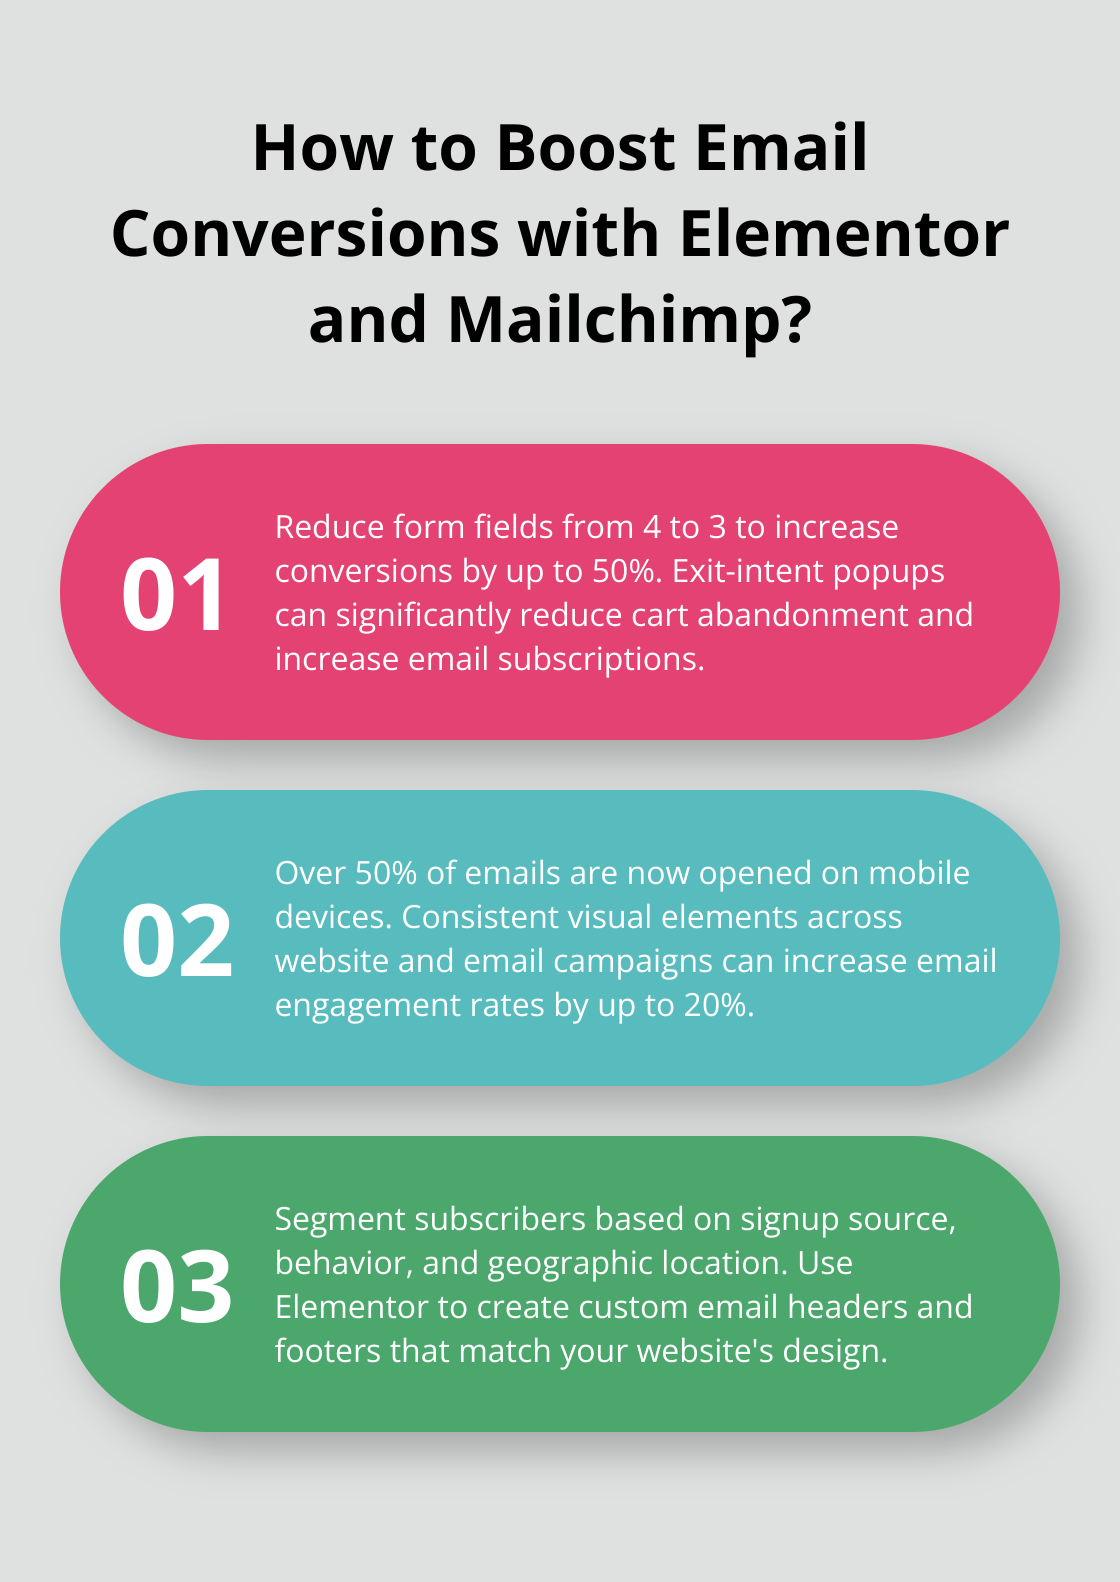
Minimize your form fields. Studies indicate that reducing form fields from four to three can increase conversions by up to 50% (a significant improvement for such a small change). In many cases, requesting only the email address suffices.
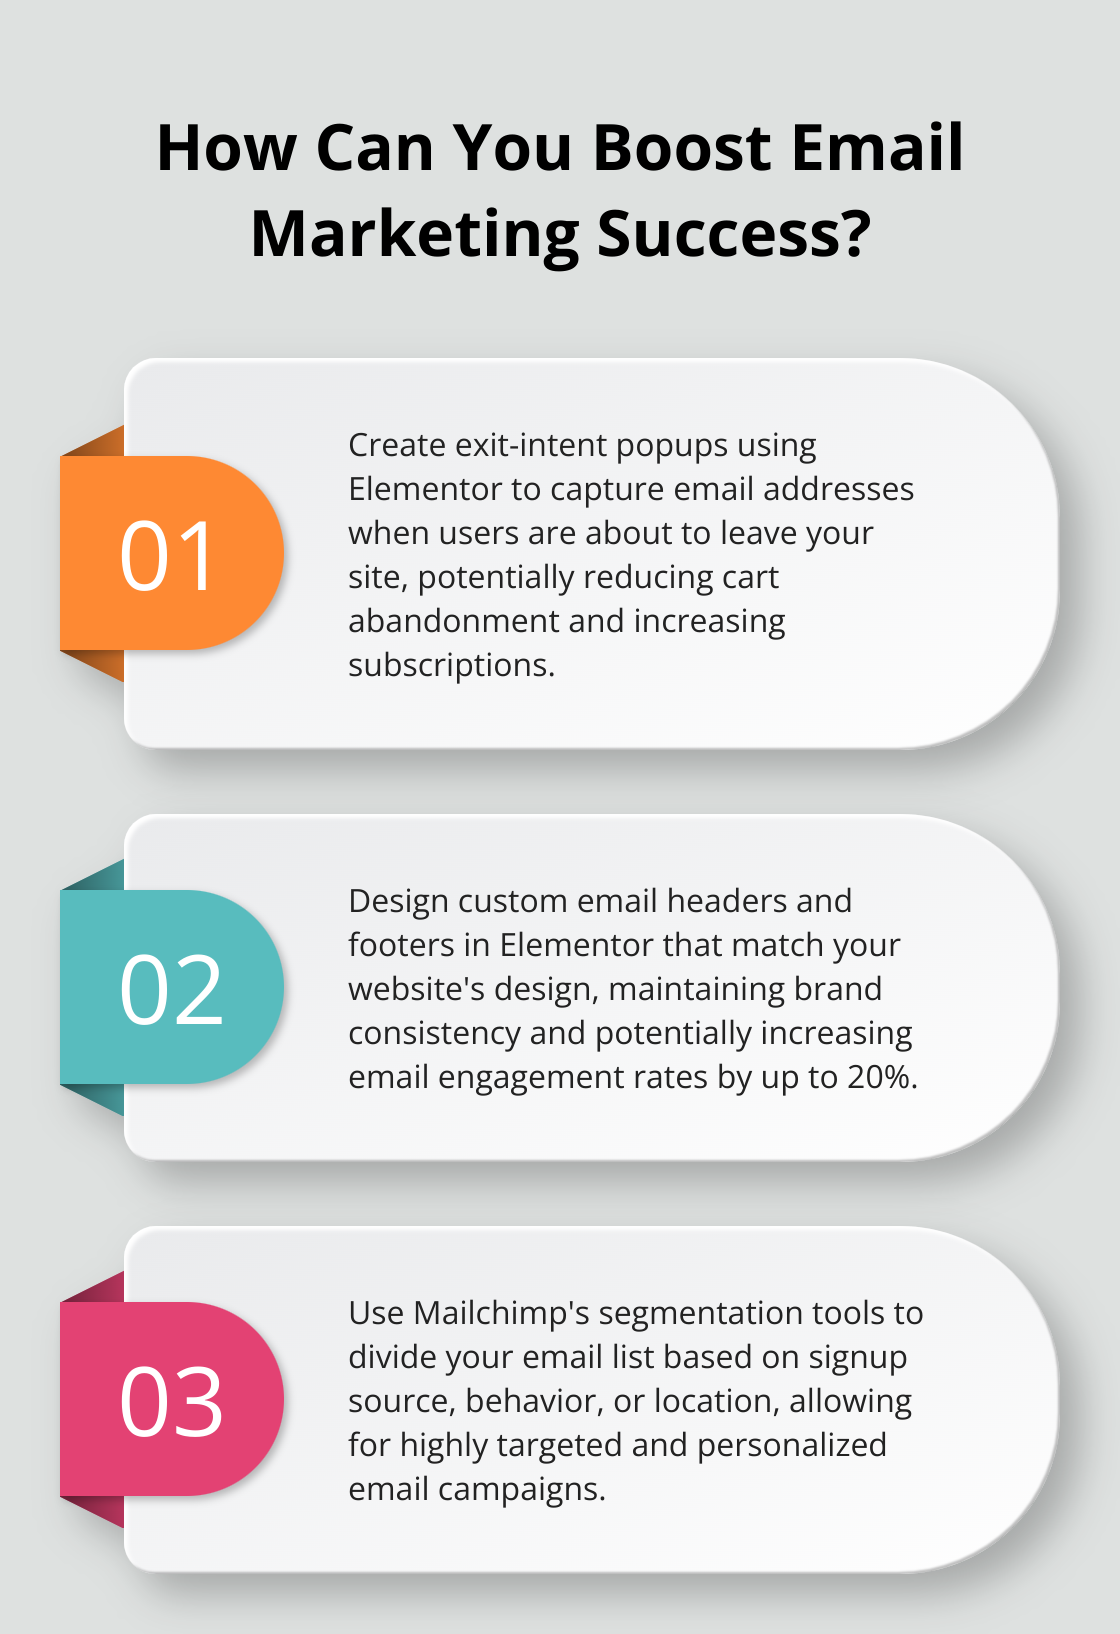
Place your forms strategically. Elementor allows form placement anywhere on your site. Consider using exit-intent popups, which appear when users are about to leave your site. These can significantly reduce cart abandonment, increase email subscriptions, and generate leads.
Segment for Personalization
After capturing leads, segmentation becomes essential. Mailchimp’s robust segmentation tools allow you to divide your list based on various criteria, enabling highly targeted campaigns.
Start by segmenting based on signup source. Create distinct Elementor forms for different pages or content types on your site. This approach allows you to tailor your email content to the specific interests that initially attracted the subscriber.
Behavioral segmentation offers another powerful tactic. Use Mailchimp’s tracking to segment subscribers based on their interactions with your emails. For instance, create a segment of highly engaged users who consistently open your emails and click on links. These subscribers might become prime candidates for exclusive offers or beta testing opportunities.
Geographic segmentation can yield impressive results. If you run a business with a physical presence, use location data to send targeted promotions or event invitations to subscribers in specific areas.
Leverage Elementor’s Design Features
While Mailchimp provides its own email templates, using Elementor to design your emails creates a more cohesive brand experience. Elementor’s design features allow you to maintain consistent visual elements across your website and email campaigns.
Use Elementor to create custom email headers and footers that match your website’s design. This consistency helps reinforce brand recognition and can increase email engagement rates by up to 20% (a significant boost for any email campaign).
Take advantage of Elementor’s responsive design capabilities. With over 50% of emails now opened on mobile devices, ensuring your emails look great on all screen sizes becomes crucial. Test your designs across various devices to guarantee a seamless experience for all subscribers.
Incorporate dynamic content blocks in your email designs. These can automatically update based on subscriber data or behavior, creating a personalized experience without the need for multiple email versions.
Optimize for Conversions
Your email design should guide subscribers towards your desired action. Use Elementor to create clear and compelling call-to-action (CTA) buttons. Make these buttons stand out with contrasting colors and persuasive text.
Try A/B testing different elements of your emails. Elementor makes it easy to create multiple versions of your email templates. Test variables like subject lines, CTA placement, and image usage to determine what resonates best with your audience.
Include social proof in your email designs. Use Elementor to showcase customer testimonials, ratings, or user-generated content. This social validation can significantly increase trust and conversion rates.
By implementing these strategies, you can enhance functionality and streamline your workflow, maximizing the potential of your Mailchimp-Elementor integration.
Final Thoughts
The integration of Mailchimp with Elementor creates a powerful marketing ecosystem. This combination enhances your design capabilities, allowing you to craft visually appealing opt-in forms that match your website’s aesthetics. The seamless data flow between these platforms ensures accurate capture and storage of subscriber information, enabling you to leverage Mailchimp’s advanced segmentation and automation features for more targeted campaigns.
We encourage you to maximize this powerful combination to set yourself up for email marketing success. You’ll create more engaging forms, segment your audience effectively, and design emails that resonate with your subscribers. Regular testing of different form designs, email templates, and segmentation strategies will help you find what works best for your audience.
Pluginizer offers access to over 15,000 premium plugins and themes for a one-time subscription fee, further enhancing your WordPress capabilities. This extensive toolkit can help you take your website to new heights and improve your email marketing results. Start implementing these strategies today and watch your campaigns soar.